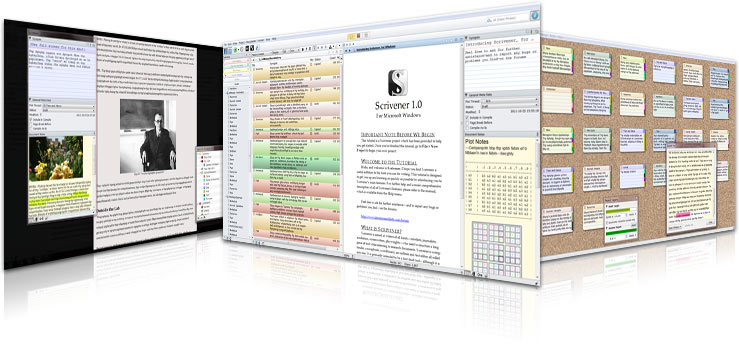
You’ve no doubt heard of Scrivener before. Developed by Literature and Latte, this piece of novel-writing software is expansive, affordable, and extremely popular with experienced authors and beginners alike.
But just why is it so popular? Do you really need yet another piece of software in your life? Will it really help you write your novel?

Like anything, Scrivener isn’t for everyone. But it is an objectively handy tool for writers who are serious about working on a long-form project.
Let’s take a look at some of the reasons Scrivener is useful for novel-writing, then dive into a Beginner’s Guide to get you started with the program.
Table Of Contents
Why should I use Scrivener to write my novel?
There are many benefits to using Scrivener to write a manuscript. Here are just a few:
- It’s a one-stop shop for your novel. As well as a word processor, Scrivener is:
- A planning, plotting and outlining tool
- A place to collate and organise notes and research
- An editing platform
- A formatting tool (especially useful for self-publishing).
- It allows you to restructure, rearrange and reshape your novel much more easily than standard software such as Microsoft Word.
- It helps keep you motivated and on track with your novel-writing goals through various handy functions, such as its statistics and Project Targets features.
- It can also be used for developing texts other than novels – plays or film scripts, for example, can be created in Scrivener’s Screenwriting mode.
There are a few potential downsides to Scrivener – namely, that it takes some time to learn how to navigate, and that it isn’t free (although the one-time cost you pay is very reasonable, considering what you get).
If you’re interested in the program but not quite sure if you actually want to purchase it, consider using the free trial. That way you’ve got 30 days to decide whether it’s right for you.
If you do have Scrivener installed, let’s jump into our Beginner’s Guide with everything you need to know to get going.
Getting started
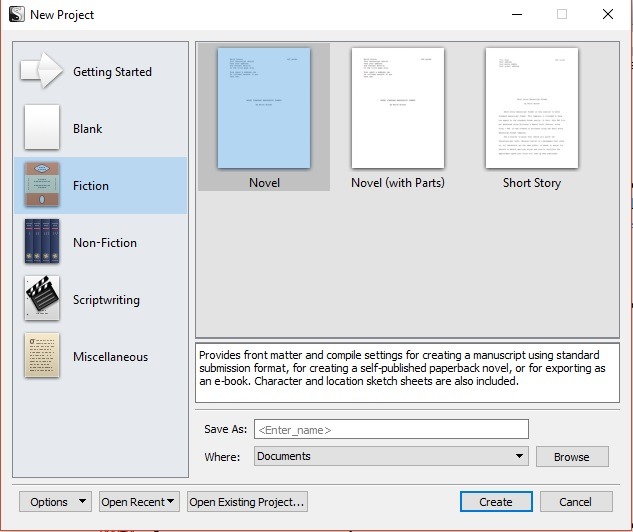
When you first open Scrivener, you’ll be greeted by a ‘New Project’ window. Here, you can choose which category your project falls into: Fiction, Non-Fiction, Scriptwriting, or Miscellaneous (for any other type of project).
If you’re writing a novel, select ‘Fiction’, then choose between the Novel and Novel (with Parts) formats. There’s also a Short Story format for when you’re working on short-form pieces.
Once you’ve chosen your novel format, your new project will be created, and you’re ready to get started!
Before you begin writing, though, let’s get familiarised with the Scrivener interface and all its features.
The interface
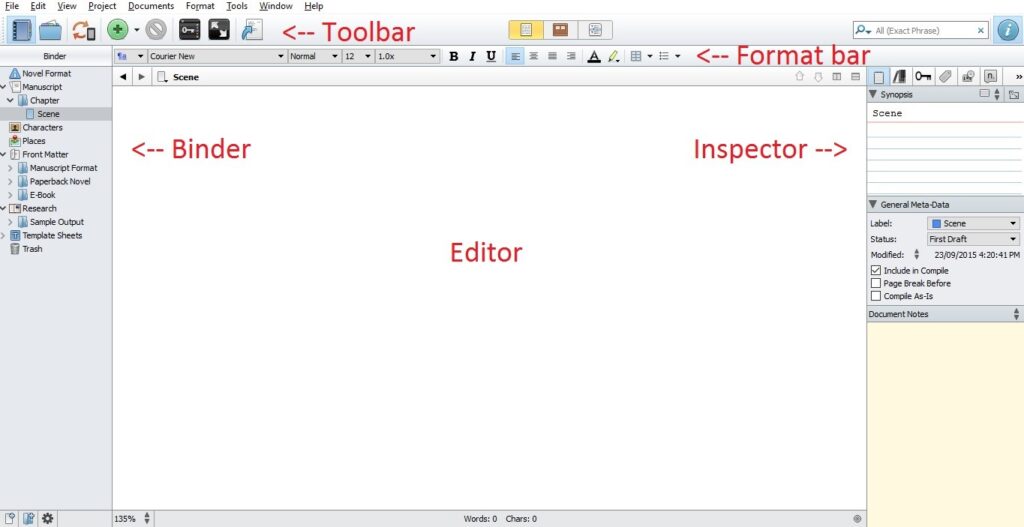
There are five key aspects to Scrivener’s interface:
- The toolbar, at the top of the screen. This contains icons that act as shortcuts to different tools and parts of the program.
- The editor, in the middle of the screen, which is where you will do most of your work. The editor can be split into two screens, allowing you to view two parts of your project at once.
- The format bar, above the editor, which contains text editing and formatting tools.
- The inspector, accessed by pressing the ‘i’ symbol in the top right corner. The inspector shows additional information for the active file/s in the editor, such as synopsis details, meta-data and other notes.
- The binder, on the left-hand side, which collects all the files within your project in the one place. The binder houses your manuscript itself as well as notes and research materials. We’ll take a closer look at the binder below.
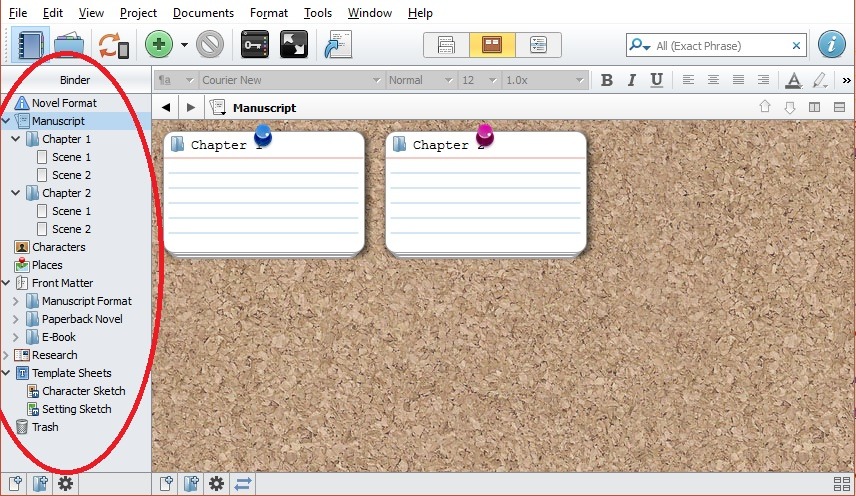
The binder
There are a number of different sections in the Scrivener binder, so let’s take a look at what each is for.
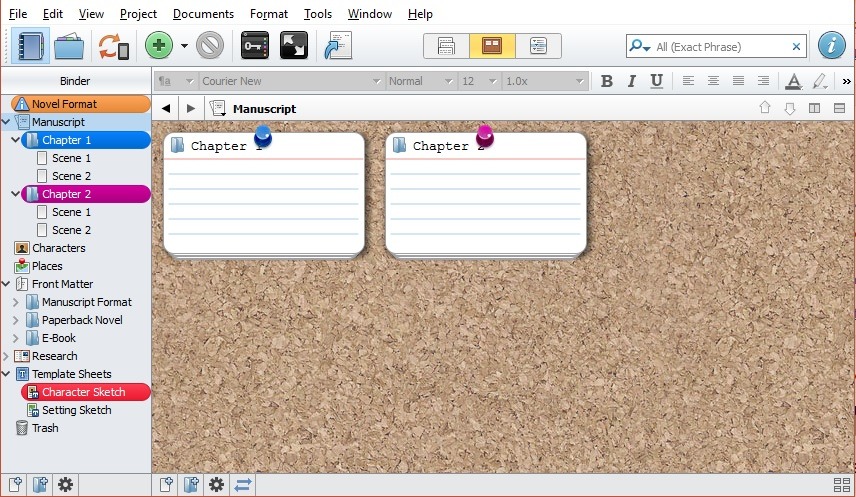
Manuscript
This is the main section of the binder, as it’s where you’ll actually be writing and organising your novel manuscript. Within this section, you can add as many sub-folders and documents as you like.
To help keep things organised, create a new folder for each chapter and a new document for each scene within a chapter. This allows you to rearrange sections of your work whenever you like, and makes things a whole lot easier when it comes to editing and restructuring!
Characters and Places
These sections allow you to keep notes and details about your novel’s various characters and settings. You can store anything from documents to images here, and it’s super handy to have all your notes and inspiration within easy reach while you’re writing.
If you like, you can use Scrivener’s in-built templates for creating character profiles and setting sketches – see the section on ‘Template Sheets’ below.
Front Matter
‘Front matter’ refers to all the pages that come before the actual story in your book: the title page, copyright details, the dedication and so on.
In the Front Matter section of the binder, you’ll find folders containing front matter templates for three different formats: manuscript, paperback novel and e-book. These can be filled out when you’ve finished writing your novel and are getting ready to export it from Scrivener.
Research
This is the place to store any research files you need. Scrivener supports text, image, multimedia, archived web pages and PDF files, so you can import any of these into the Research section of the binder for easy access.
Template Sheets
As we mentioned above, Scrivener provides some template sheets for character and setting development. When you expand this folder, you’ll see two documents entitled ‘Character Sketch’ and ‘Setting Sketch’. You can copy these templates as many times as you like and fill them out with character and location details for your novel.
Trash
This one’s pretty self-explanatory – anything that gets deleted in Scrivener ends up in the Trash section of the binder. All deleted files can be accessed by clicking on the Trash folder (until you empty the Trash), meaning you can recover any files you may have accidentally deleted.
Beginners’ tips for writing in Scrivener
Once you’ve familiarised yourself with Scrivener’s interface, and have found your way around the binder, it’s time to start writing!
Here are some handy tips and tricks for Scrivener beginners.
Use word count targets to help track your writing progress
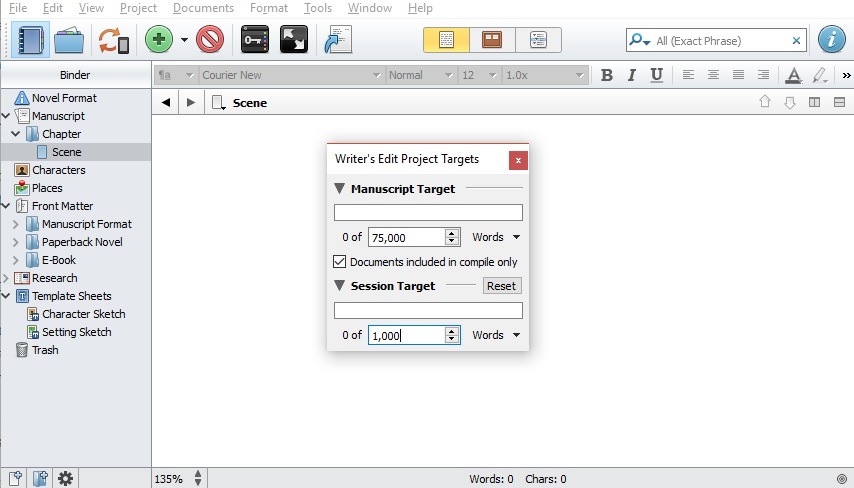
In the ‘Project’ drop-down menu at the top of the screen, there’s a handy function called ‘Project Targets’. Here, you can set word count goals for your manuscript as a whole, and for each individual writing session. This is a great way to keep yourself on track and monitor your progress.
If you don’t want to set specific targets, you can keep track of your word count by clicking ‘Project’ then ‘Project Statistics’ instead.
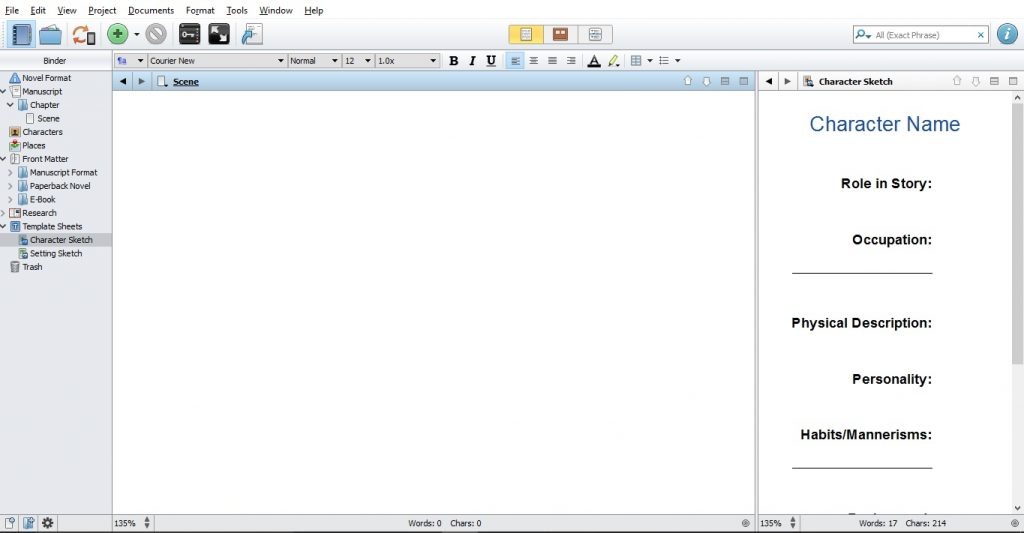
Use split-screen mode to view two files at once
One of the great benefits of Scrivener is that it allows you to view more than one file in the editor at a time. So, for example, if you’re writing and want to check your notes for something, you’re able to view those notes without having to move away from your manuscript at all.
To use split-screen mode, go to the top right corner of the editor, where you’ll see two icons showing horizontal or vertical splits. Choose one, and then simply open up your extra file within that window. You’ll now be able to view two things side by side (or one above the other).
To return to single-screen mode, simply click the full-screen icon in the top right corner.
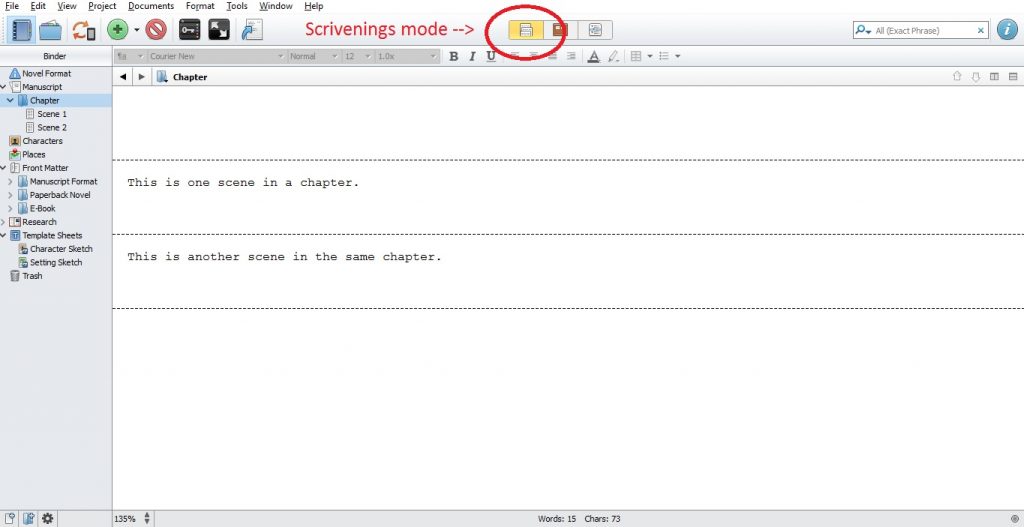
Use Scrivenings mode when editing or reading your work
As we mentioned above, you’ll generally be using folders and files within those folders to organise your work. However, if you want to view all the documents within a folder together – for example, all the separate scenes within a chapter one after the other – there’s an easy way to do it.
When you’re in a folder, simply click the Scrivenings button, which is the left-hand button in the group of three that sits in the toolbar above the editor. This will automatically arrange all your documents to be viewed within the one window.
You can also use this function to view the manuscript as a whole. Simply click on ‘Manuscript’ in the binder, then click the button for Scrivenings mode, and your whole manuscript will be displayed.
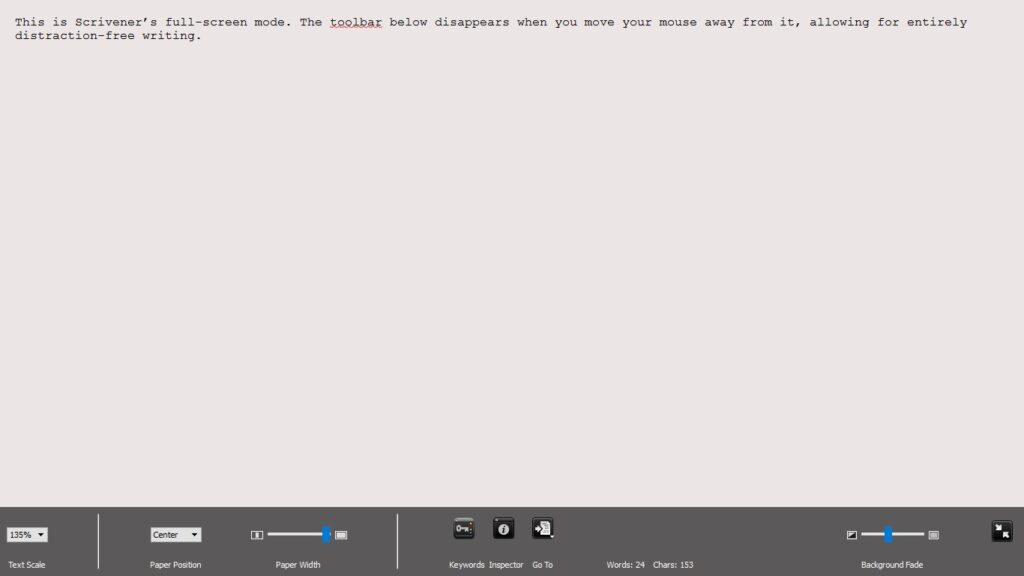
Use full-screen mode to minimise distraction
We’re all familiar with the distraction of multiple internet tabs and other apps when writing. However, when using Scrivener, you have the option of entering full-screen mode to get rid of all other distractions and focus on your writing.
To open full-screen mode, either use the F11 keyboard shortcut or click ‘View’ > ‘Enter Full Screen’. Distraction-free writing time awaits you!
Add labels to help organise your work
If you want a visual indicator to separate different files in the binder’s Manuscript folder, try using labels. Adding a label to a folder or file highlights it in a particular colour in the binder, allowing you to associate it with its label at a glance. (To ensure the highlight feature is activated, go to View > Use Label Colour In > Binder.)
For example, if you’re writing a manuscript with multiple character viewpoints, you may wish to highlight each character’s POV chapters in a certain colour to help you distinguish between them in the binder.
To add a label to a folder or file, right-click it in the binder and select ‘Label’. Scrivener offers a number of predefined labels such as ‘Idea’, ‘Notes’, ‘Chapter’ and ‘Scene’, but you can also create your own labels by clicking ‘Edit’ and then adding a custom label.
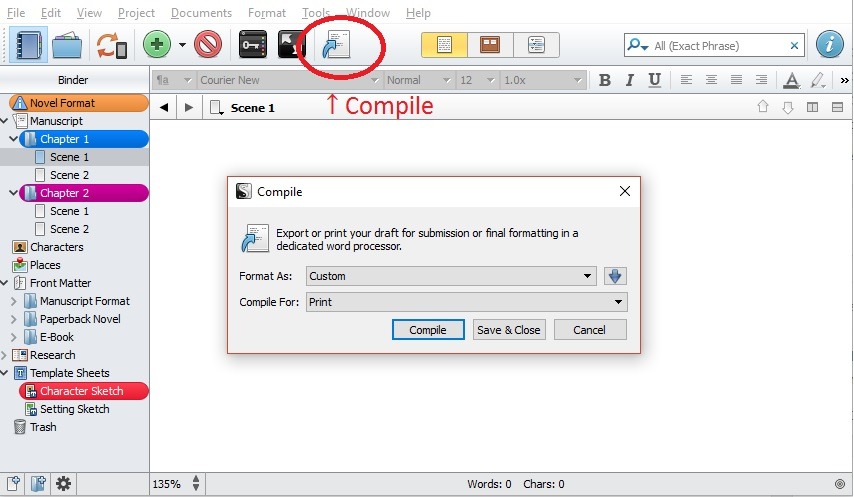
Export your project in a number of different formats
When you’ve finished your project, you’ll want to export it from Scrivener so you can print it out, self-publish it as an ebook, send it to beta readers etc. You have a number of options when it comes to which file format you’d like to export your project to.
When you’re ready, click the ‘Compile’ icon in the toolbar. Here, you can choose from a number of predefined formats for both print and online mediums.
***
As we’ve mentioned, this is just a beginner’s guide help you get started with Scrivener. For a much more detailed breakdown of all its features and functions, take a look at the official manual by clicking ‘Help’ then ‘Scrivener Manual’ in the main menu.
We hope you enjoy writing your novel with Scrivener! If you have any tips or tricks of your own, feel free to leave them in the comments below. Happy writing!
8 responses to “The Fuss-Free Beginner’s Guide To Scrivener”
Thanks for this guide! I’ve been using Scrivener for short stories and love it, but I feel like I just use the basic elements of it. It helps to get a refresher of what all you can do with it.
You’re welcome, Michelle! The amount of features it has can definitely be overwhelming, but the more you use it, the more tricks you learn 🙂
All the best with your short story writing!
-Claire
Still can’t figure out how to even use the Short Story feature. Super overwhelming.
Hi Neghie,
We totally understand feeling overwhelmed by Scrivener at first – there are so many features and functions that it can all feel like a bit much! But stick with it – the more you use it, the more intuitive it becomes. After you’ve selected File > New Project > Fiction > Short Story, it’s best to treat it just like you would a regular Word doc (or whatever you usually use to write short stories) at first, and then if you want to later, you can start utilising some of the other features to organise your ideas, research etc.
If you’re still having trouble, the official Literature & Latte website is very helpful, with video tutorials and forums in which users have posted questions similar to yours and received helpful answers.
Wishing you the best of luck!
– Claire
Hi, Claire, this is a great breakdown of how Scrivener works. l am currently writing the ending of my first novel in a thriller trilogy. I have always found Word to be a bit clunky and dodgy, to be honest, so Scrivener is looking very attractive right now. Is the $30 the total cost for the entire program?
Hi Jen,
So glad you found the breakdown helpful! It sounds like you could make good use of it to write your trilogy.
At the moment, the program costs $40USD for the Windows version and $45USD for the Mac version, which is the entire one-time cost for the program. Once you get into all the features it offers, you definitely realise that this is really great value for money!
Wishing you all the best with your thriller novels and your foray into the world of Scrivener.
-Claire
This is really great. One thing I do is label the chapter scenes as “ch. 1, sc. 1,” and rename it if I move it around. Naming it in this manner ensures that I’m keeping the scenes in the right chapter.
Great tip Rosemary! Little tips and tricks like that can make life a whole lot easier when using Scrivener 😉