Taking the time to outline your novel can save you grief in the long run. An outline helps keep your story on-track and progressing past the initial thrill of beginning your work. Maybe you can’t wait to start writing, or maybe you’ve already started but are running into problems. This guide will explain all the techniques you’ll need to craft an effective outline for your novel.
Table Of Contents
Constructing a Timeline
The first step is to create a timeline or plot skeleton with your plot ideas. Be sure to include back story elements, both before the novel’s events and at the point they are revealed to the reader. Don’t worry if you little to start with — it’ll quickly build up. Make sure to leave space for more details.
There are many ways to construct your story outline. Try a few techniques and see what works for you. You could start by writing out key events, or by writing a short paragraph for each narrative arc within your novel. Either way, you’ll eventually need to look at your novel as a compilation of separate events and as a whole.
If you’re stuck with what to do in the middle, or even the beginning, try starting with what you want for the ending and then reverse engineer a path to reach that result. This works within minor plot points as well. If you know you want character B to disappear and the other characters to end up in a boat before moving onto the next scene, brainstorm with that end in mind.
Depending on your story and how you like to work, the timeline could take on several forms. A dot-point list, an actual timeline or a mind-map are the most common, though there are other forms you can use. Often in the planning stage, it’s easier to use pen and paper so you can draw arrows and cross things out. This leaves a reminder of what you’ve tried and what hasn’t worked.

Technique: Write a List
If your story is relatively simple and short, the list-form is often the best way to start your outline. Focus on the core points of the story and jot down any additional ideas as you go. If you were writing “Little Red Riding Hood”, your list-form timeline may look something like this:
- Grandma makes a red coat for her granddaughter
– The granddaughter is called Little Red because she always wears it - Little Red goes to visit Grandma, who’s sick (novel opening)
– Her mum asked Little Red to deliver food (or medicine?) - On the way, she meets Wolf and tells him what she’s doing
– Wolf runs ahead, eats Grandma and disguises himself as her - Little Red is distracted by flowers along the way
– Wolf wears Grandma’s nightcap and glasses, then hides the rest of himself under the covers - Little Red arrives, but notices that Grandma looks different
– Wolf imitates Grandma’s voice - Little Red notices unusually big: ears, eyes, teeth
- The Wolf reveals himself, Little Red screams and a nearby woodsman kills Wolf
Currently, this is a basic outline and needs a lot more work if it wants to be novel-length. Writing prompts can often help you flesh out your story. Use your imagination and check below for notes on characters, setting and plot.
Technique: Map the Events on a Line
For stories that span several weeks, months or years, time becomes a big consideration when placing events. Simply writing the same points you’d write on a list along a line can help create a realistic sense of time.
When deciding the duration between events, remember realistic limitations of time. For example, there is time lost when travelling, or when there are so many meals a person can eat or disasters a person can prevent realistically in one day. Many other factors change with time, such as characters’ ages and seasons.
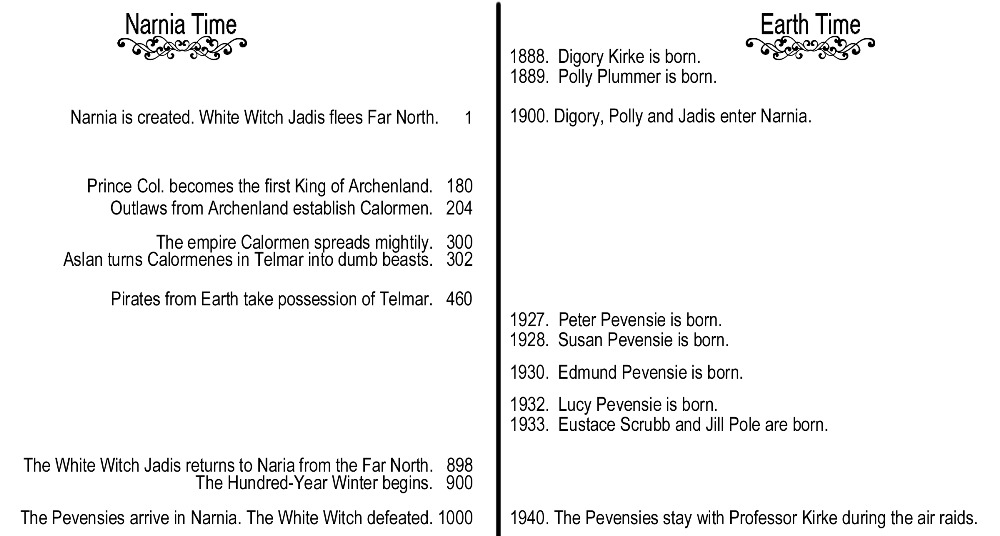
Line-form can also help when comparing two separate time streams, such as in The Lion, The Witch and The Wardrobe.
Lines are more difficult to edit than lists, but a good trick to keep your line flexible is to use index cards or sticky notes that can be easily shuffled and switched around. If you are limited for space, Scrivener and Aeon Timeline are two programs popular with writers for this and other purposes.
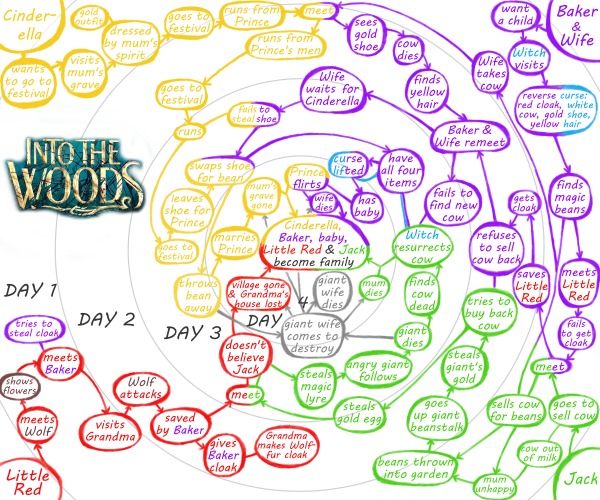
Technique: Master the Mind-Map
Mind-maps work well for stories that start with a single point and then diverge into several threads, often alternating between characters. Alternately, the story could be several threads converging to one point, like the musical Into The Woods.
To depict the passage of time in a mind-map and be able to easily compare one thread’s time state with another’s, put the point of convergence at the centre, and then draw circles going out. Just like tree rings, each circle you draw can represent another segment of time. When you expand your mind-map, the points in each thread can be placed in its ring-like time “zone”.
Explore Your Character Arcs
Character profiles are useful in the initial planning stage. However, when outlining your novel, you need to go beyond this static document. Character arcs show the change or growth a character goes through, and the stages required to get there. The changes could be greater or smaller self-esteem, mastering that ninja technique or realising that money doesn’t solve all problems.
Change, transformation, is a constant in our lives and if you can impel some kind of emotional change within your character, it creates an arc of behaviours and adds another dimension to who he or she is” — Syd Field, The Screenwriter’s Workbook
First, determine exactly what part of the story is reflected by the character profile. Often this is the start of the novel. Make a list of any changes you want the character to go through, or changes they need to go through to achieve the profile. Then, check the plot and make another list of possible changes story events could cause in your character, making note of which changes you want.
If the two lists are contradictory, you may need to reassess your character or plot, or be prepared to work hard and write a character that is believably contradictory. From here, you can continue with the list form, or use a line, mind-map or paragraph to detail out your character arc.
For characters that go through significant change, or for stories that look closely at human psyche, you may want to do several mini character profiles. Consider dropping aspects that won’t change such as physical appearance, unless your character becomes severely ill or can shape-shift.
Another way to use character arcs is to compare them to each other. Firstly, make sure all your characters don’t share the same arc, unless you’re purposefully trying to make a point. If a few character have similar arcs, try to use one as a comment on the other, or demonstrate the difference a decision can make.
Also check if any character arcs can assist or become an obstacle for another character’s arc. This can add a new depth to characters’ relationship, and maybe spark off a subplot.
Character arcs can then be used to flesh out your plot. Once you’ve done the arc, make sure the plot supports every small change the character undergoes. If it doesn’t, use this guide to inspire several new plot points.

Establish Your Settings
Setting is vital to every story. It helps a reader fall into your fiction world, even if your story is set in Earth-as-we-know-it. It can also be critical to the plot: imagine if Grandma’s house wasn’t deep in the woods. Little Red may never have met the Wolf.
The setting also tells the reader about your characters. If Little Red lived in a castle, she may have been more aware of dangerous people, and Wolf’s motives may have been more than hunger.
Setting can become vague in writing when the writer doesn’t know their setting well. The same way you have character profiles, settings need profiles too. The process of planning your setting is slightly different if your story is set in a real place, though it follows the same general steps.
Before you get to know your setting, you need to choose your setting. If you’re stumped for ideas, the best place to look is in your plot. Setting is tightly linked to plot, primarily affecting what is possible. Does a character need to be or feel trapped? Go for a fort, boarding school, or a safe house in the middle of nowhere.
Usually your story will take place in more than one setting, so go through your plot and make note of the best setting for each scene.
When you start working on details of your setting, you may already have an idea in your mind. Victorian mansion, sea cliffs, military base, Sydney Opera House. Even if you feel familiar with the setting, go around with a camera or search images online.
Make note of what aspects you notice first: is the colour gaudy, do the edges look harsh, are there hundreds of trees? To mix elements of more than one setting, you can put the images in a document and make notes such as “this roof, but that balcony and a bluer colour”. Create a collage or bring out the sketchbook.
Tear images out of home magazines or catalogs and put them on your vision board. You can also draw floorplans, which can help when you’re trying to navigate your character” — Charlotte Dixon
Maps and floor plans are also a handy tool. If a character spends a lot of time in a building, you need to know the layout so they don’t come from the kitchen into the dining room one time and the ballroom another.
Likewise, if they travel a lot or go outside to a certain place frequently, maps will help keep your orientated. Draw the street of your character’s favourite coffee shop; what will they see as they sip on their routine mourning hot beverage?
Maps and floorplans can be drawn by hand on plain, lined or grid paper, or done in excel by changing the cell sizes to square. Grid is particularly useful for smaller buildings. It may not matter if your castle is 100 or 110 metres long, but there’s a big difference if a house is 10 or 20 metres.
For smaller buildings, also make sure that it is reasonable to fit all the furniture you describe in a single room. If you want, there are also free 3D modelling programs such as Sketch Up, but generally simple 2D maps are enough.

You may also want to create a setting arc if it undergoes a serious change in the story. This would likely be either physical damage or a change in emotion or meaning. For the former, make notes of what is damaged, how it is damaged and the differences (such as being able to see through a hole in a wall).
Conversely, perhaps a damaged place was fixed or renovated. If the emotions connected to a place change, pick out the details. A sagging roof that once may have seemed a sign of degradation could simply add character.
Choose the Shape and Style of Narration
There are three narration shapes your plot can take: linear, non-linear and circular.
Linear narration is when the novel progresses in the typical chronological order. For example, Little Red leaves her house, meets Wolf in the forest and then again in Grandma’s house.
Non-linear narration shakes things up a bit. In this case, for example, Little Red meets Wolf at Grandma’s, recalls meeting him earlier, is saved by the woodsman, recalls her mum telling her to be careful. Two well-known non-linear novels to have a look at are Catch-22 by Joseph Heller and The Time Traveler’s Wife by Audrey Niffenegger.
Circular narration starts and ends with the characters in the same place. This “place” can refer to a number of things such as a geographical location, an emotional or mental state, or a hierarchical position.
Whatever “place” means for the beginning and end, it should also be important in the middle. The novel The Chrysalids by John Wyndham starts with telepathic mutants being shunned by normal society. They attempt to create a safe place for themselves. However, when they find a whole town of telepaths, they’re looked down on again because of the weakness of their mutation.
If your novel is to be in a nonlinear or circular shape, it’s best to first craft your outline in a linear form. This makes it easier for you as the author to keep track of the story and helps prevent the plot from becoming confused and lost within itself.
If you’re timebending or rewinding or flashbacking or Groundhog-daying or getting surreal or showing a series of vignettes that add up to a whole or chopping around like the film Memento, you the writer need to know what the simple order is” — Roz Morris

Assess Your Plot-in-Progress
While your outline is still in its rough, overview state, it’s good to check that the plot is working. To make sure the plot flows, check for gaps both chronologically and dramatically.
A chronological gap occurs when an underdeveloped story jumps over a period of time. It can be disconcerting for the reader if your character is sweating it out in the middle of summer, and then, in what seems a few days, is at home trying to get closer to the fireplace.
Reassess your plot and check for unaccounted days, months, weeks or years. The significance of missing time is relative. If your story spans a period of a year or more, a few days or weeks won’t matter so much.
To fill the gap, you could think of an event to develop a character or a mini obstacle for your protagonist to overcome. Of course, you always have the option to tell your reader that a few uneventful weeks or a busy month passed with no plot progression. Doing this too often can be distracting, but at the same time you don’t want pages of nothing happening.
“References to time and day (or month or season or year) are necessary to keep readers linked with story events and hold them deep inside the fiction” — Beth Hill
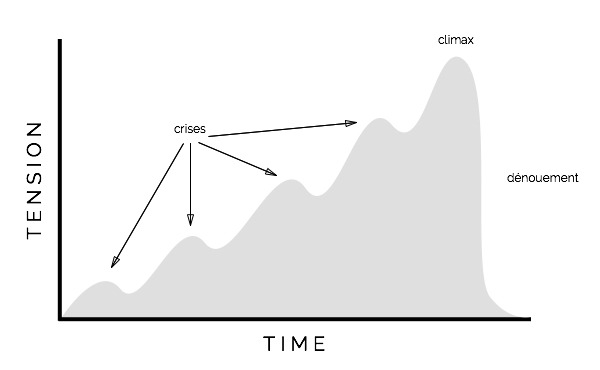
A dramatic gap occurs when the tension of your novel declines when it shouldn’t. The best way to identify these gaps is to draw the story arc as a graph line. Use different colours for subplots to check that the main plot isn’t being overshadowed.
You may encounter lulls in tension shortly after an obstacle is defeated. This is where dramatic lulls are okay as long as they don’t last too long. Overall, the main plot should be increasing in tension as it heads towards the climax.
If you’ve decided to use 1st person perspective, or are considering it, draw the arc from both a generalised view and then from the 1st person narrator’s perspective. From here you can see whether the delay or lack of knowledge from the narrator’s perspective creates a better dramatic arc. To fill dramatic gaps, build more plot points in strategic places and work on increasing tension.
If it seems that your story isn’t working, trust your instincts. Readers can tell when something is a bit off and, as a writer, you’re a reader too. Be honest if something isn’t working—it’s easier to fix now than later.
If you can’t identify the root of the problem, take a break or ask some trusted writing buddies to look over it. Also research the genre’s conventions. If you’re writing genre fiction, look into a tried and tested outline such as the hero’s journey or the eight-point arc.
Identify the Core Message
Novels have a core message, whether it’s clear or not. You could successfully write your novel none the wiser of its deeper meanings. Yet, by knowing the core, you can write a stronger novel.
Identifying your core helps when you need to decide between two possibilities, and keeps the novel feeling as one whole piece of work.
Novelists, just like filmmakers, need to truly understand the story they are trying to tell and what impact or take-home feeling or message they want to leave with their readers” — C. S. Lakin
Your core message and themes emerge naturally with your story and can be a phrase, a word or a question. You’ll instinctively know when you’ve hit on your novel’s core or when you’re getting close to it. Here are a few ways to help identify your core message if you don’t already know it:
- Identify 1 – 4 central or important themes
- Look at your protagonist’s goal / desire or main obstacle
- Sum up your story in one sentence (i.e. “pitch”) keeping note of the above two points
- Make a list of published novels you think are similar. Can you identify their core messages?
- Share your story premise with others
Once you’ve identified your core, it’s helpful to go back and tweak plot points or characters to align with this. Be careful to not undermine your story by making the core too obvious or preachy.
Consider if there is a motif or style that is appropriate for your core. There’s a chance that you may not like the core message you identify. At this point you have the option to run with what the story says, or rework the aspects of your story that portray the undesired core message.

Segment Your Outline Into Chapters
The timeline has given you a basic outline, but it needs to be more concrete and detailed. The story can be broken down into sections of four or five parts, or individual chapters or scenes.
This helps flesh out your novel and define roughly how many words or pages to allow for a certain plot point, subplot or character introduction. Otherwise your beginning might accidentally end up longer than the middle!
It’s useful to plan a few goals to achieve in each chapter or segment. These goals may be:
- Character-orientated: “reveal Character B’s low self-confidence”, “introduce character C and their personality”, “show that characters C and D have know each other for years”
- Plot-orientated: “find murder weapon”, “discover object hidden in ancient ruins”
- Setting-orientated: “make the marshes seem scary”, “reveal the clock tower’s history”
The goals may seem obvious, but having them clearly defined and written down can help focus you when writing that section.
Working with story structure is not about ‘getting it right’. It is about making your story as clear and specific as it can be. Focusing on your characters’ desire or goal will lead you directly to the dilemma at the heart of your story.” — Alan Watt
One of the most common structures is the Three-Act Structure. While it’s not the only way a novel can be arranged, there are important aspects to include in the Beginning, Middle and End section.

Essential Components of Your Story’s Beginning
The first few chapters or so have a vital role to play, regardless of when in your story’s timeline the novel starts. The purpose of the beginning includes introducing and establishing character, setting and plot.
Character
From the beginning, the protagonist and antagonist must be introduced and clearly identifiable, even if the details of the latter are hazy. The protagonist needs to own what is, essentially, their story. You want to introduce a proactive protagonist and make the reader care about them.
It’s best to introduce all major characters. If your protagonist has to travel for a while before meeting a certain major character, introduce them with a short scene from their perspective, or through rumours that the protagonist hears.
Setting
Before getting into the juicy Act 2, your reader needs to be grounded in your world. Show your reader where and when your story is set, including indications of the socioeconomic status of the location and characters.
You also need to establish the rules of your fictional world, even if that just means establishing that they are the same rules as on Earth-as-we-know-it. This doesn’t mean all of your settings secrets should be revealed at the start. Keep setting details rich but controlled.
Plot
In the early chapters, give your reader an indication of what life is like for the protagonist before the catalyst that propels them onwards. Typically, life is either peaceful or lacking something.
“Life before” doesn’t mean back story. This should be revealed more slowly, if at all. The protagonist may meet their first obstacle, which in itself can help reveal the protagonist’s “life before”.
Act 1 ends when the protagonist decides (willingly or not) to pursue the main goal of the story, known as Plot Point 1. It’s possible at this stage that the protagonist and reader don’t know the full, final goal, such as Frodo agreeing to take the ring to Rivendale, but ends up going all the way to Mordor. Either way, the journey of the main plot needs to be clearly introduced. You may also choose to introduce, imply or foreshadow one or two subplots.
First Chapter
Unless you have a prologue, the first chapter is a reader’s introduction to everything. A novel can start anywhere — even at the end of the story! Because of this, it’s often best to finish your outline before choosing when to start.
There are a range of key aspects to weave together for your opening. At this year’s Digital Writer’s Festival, Euan Mitchell had this advice for first chapters:
For me, I’d come… with the protagonist straight up. There’s three trialled and tested techniques that authors use. There’s: show them in a situation of suffering or pain, show them with a sense of humour, or show them as a part of a family. There are others, but those are the three main ones.”
Key aspects to include:
- Introduce protagonist (including a couple defining physical features)
- Show protagonist goal / an obstacle / both
- Establish setting (but don’t overdo details)
- Define the genre, voice, mood and tone
- Incorporate core message / main themes
- Don’t overload with new characters
- Don’t fill with back story
Advised aspects to include:
- Introduce main antagonist or idea of antagonist
- Treat as a mini story arc
- Have the protagonist make an important decision
- Start the main plot’s action / journey
To pick out more great ideas for the first chapter, grab a dozen books and read their first chapters. Check what is revealed, what is focused on and what is absent. Then do a more focused study with half a dozen or so books with a similar style or genre to your story.

Essential Components Of Your Story’s Middle
The middle is the longest part of your novel and the most likely to sag. Pacing is the key here, since writers often find it had to keep the middle plot moving. Also take care not to race from one plot point to the next. Splitting the middle into equal sections and outlining each of them will help you control the story’s pace.
Although one of the main purposes of the middle is to build up to the climax, it doesn’t mean nothing can happen before this point. Set your protagonist or other characters obstacles, which ideally also lead directly to the final climax. In this outlining stage it may be useful to work on your ending before the middle. Then you have a clear idea of where the middle needs to go.
Minor characters’ and subplots’ arcs may finish, as well as some major characters’ arcs. This doesn’t mean they disappear from the story, it just allows the questions left hanging to focus on the protagonist and antagonist in the ending.
Midpoint
The midpoint is, as it sounds, in the middle of your novel. It’s a very important stage to shake things up so things don’t get too repetitive. The midpoint involves a Shift in the protagonist’s worldview or goal. Whatever propelled them forward in Plot Point 1 has changed or isn’t enough to keep them going.
Hamlet is another really good example, because the first half of Hamlet is Hamlet’s journey to prove Claudius’ guilt. Exactly halfway through he proves it, then the second half of the story is ‘What do I do with it?’. And, actually, that’s the shape you find in all archetypal narratives.” — John Yorke
The Shift shouldn’t just come out of nowhere. It should be connected to your overall story premise or core message. At the midpoint, the tension should be raised again. This tension can either be sudden and external, leading to the Shift, or be a result of the Shift by making the situation more personal to the protagonist.

The Black Moment and Plot Point 2
At the end of Act 2, the protagonist should come across the Black Moment. Regardless of all the work they’ve done over this Act, they reach a point where their goal seems impossible. Maybe they discover that their new super skill has a fatal weakness, or perhaps the antagonist unlocks the secret to immortality.
Shortly afterwards is Plot Point 2 where something changes to propel the protagonist onto the final confrontation. Perhaps their skill has reached another level, they’ve realised that even with such a slim chance the stakes are too high, or even one of the antagonist’s henchmen switches sides.
This Black Moment and Plot Point 2 are integral to the pace of the plot. With their sense of purpose reignited, the next step is the climax.
Essential Components of Your Story’s End
Writers want to leave a lasting impression on your reader through the ending. It’s good to go back and reflect on your core message while doing the conclusion. Characters are particularly important to draw your reader’s interest and emotions. Keep your characters active until the final moment.
The hero must be the catalyst. A passerby in the street can do something ‘enlightening’ but that’s all that moment must be. The protagonist will be the one to use that clue to enable meaning in the development of the story.” — Rebecca Berto
Climax
The climax is the final confrontation between the protagonist and antagonist where the stacks are higher than they’ve ever been before, and the inner and outer conflicts come to a head. It isn’t a simple stand-alone point in your plot. The climax needs to be supported in its lead-up and its resolution.
Sometimes the climax has its own mini Black Moment. The protagonist’s initial plan is failing and they are forced to come up with a new plan under pressure, usually something more risky than they would typically consider.
Final Chapter
Act 3 ends showing the result of the protagonist’s decision at the climax. It’s good to have a scene or two afterwards to give your reader a “breather” from all the tension. Along with this, any loose ends or unanswered questions should be resolved. Novel endings are important, so you want to be sure it’s planned carefully.

Reassess and Reorder Your Scenes
With the details of the chapter breakdown, you novel is really starting to take shape. As a final task, consider checking for scenes which require reordering and tweaking. This may involve moving scenes chronologically so plot point B becomes plot point A, or plot point B stays as it is, but plot point A appears after as a flashback.
Perhaps the timing of a revelation isn’t ideal. When outlining you want to get your ideas down when they come to you. Your readers need to know that Character B is a retired spy, so you’ve put the reveal in your plot.
But now is the time to go back and check if, for the sake of mystery, a scene is better at that point in the plot or another. Perhaps the tension of the big reveal is better suited a little later or earlier.
Writing in scenes is great because anyone who’s ever published a book knows how often scenes get moved around in the redrafting and editing phase of a book.” — Natasha Lester
Reordering scenes is often done after you’ve finished writing, but it doesn’t hurt to do a mini-version of that edit now. To help identify the best order of scenes, check your plot’s tension by drawing a graph and consult your core message. If you’re uncertain, leave the scene where it is. You can always move things around later.
***
Outlining your novel is important to keep your writing on-track. While you should keep it handy as you write, you’re not limited by it. Feel free to change things around as you write. Be sure to keep control of tension and keep focused on your core. Now you’re all-set to get writing!
3 responses to “How to Outline A Novel in 11 Easy Steps”
Loved this article! So insghtful, Kyla! 🙂
Writing an outline is a tedious process and entails a lot of time thinking what scene goes next and what other details should you include. While planning the whole story itself, as well as trying to put every single scene we want in the book, we have to make sure the story development doesn’t drag the readers. To do that as properly as we could, this is where every novelist should learn and master. The art of novel outline.
This is a very important tool, I should say, to make sure our stories keep the balance from the beginning of your hero’s journey towards the climax and resolution (denouement). This 1-page outline will save us a lot of time and will make every novelist save time from thinking this and that during the writing phase, which is another tedious process (taking so much of our time). Without a novel outline before, I took a lot of months before I finish my novel versus to 30 days of my recent 2 novels this year. They’re still in manuscripts, however, finishing them feels majestic. I haven’t done that in many attempts until I came across and learned novel outline.
Thanks for sharing this information and as a novelist myself, I agree to your post. Keep it up. 🙂
Writers Edit email come to my inbox frequently.
Your “how-to” on plotting – Kyla – was very inciteful.
I am working on the re-plot of a previously published “memoir” writing attempt.
This article has been very helpful in solidifying my thoughts toward a plotting board.
Thank you for your help.
Good luck in your writing career.
Jay Cadmus